

This was my dress form before:

It's adjustable, which means that you can regulate your bust, waist and hip circumference with little wheels. The problem is, while my dress form and me have the same measurements, we did not have the same shape!
My back is more rounded, while the dress form has a very erect back, and I also have forward shoulder joints, and since I am a very short person, my waist falls about where you can see the vertical line on the photo (here, you can adjust the dress form to make the torso longer. Unfortunately, making it shorter is not possible). Because of all that, the dress form wasn't really a help in fitting. Some garments even didn't fit over it, there was a hard pulling at the back and around the shoulders! So I decided that I need a dress form that reflects more my very own shape.
I could have made a duct tape dummy, but I've read that you can't put needles into it, or that they would come out sticky, and I also don't like a lot what they look like. And I've also heard before that you can make one with fabric, too. Although I couldn't find any detailed instructions for that, I decided to give it a go, as an experiment, sort of.
So this is a description of how I did it, and although I don't know if I did it the "right" way, maybe someone will get some help out of it to avoid some of the mistakes I made!
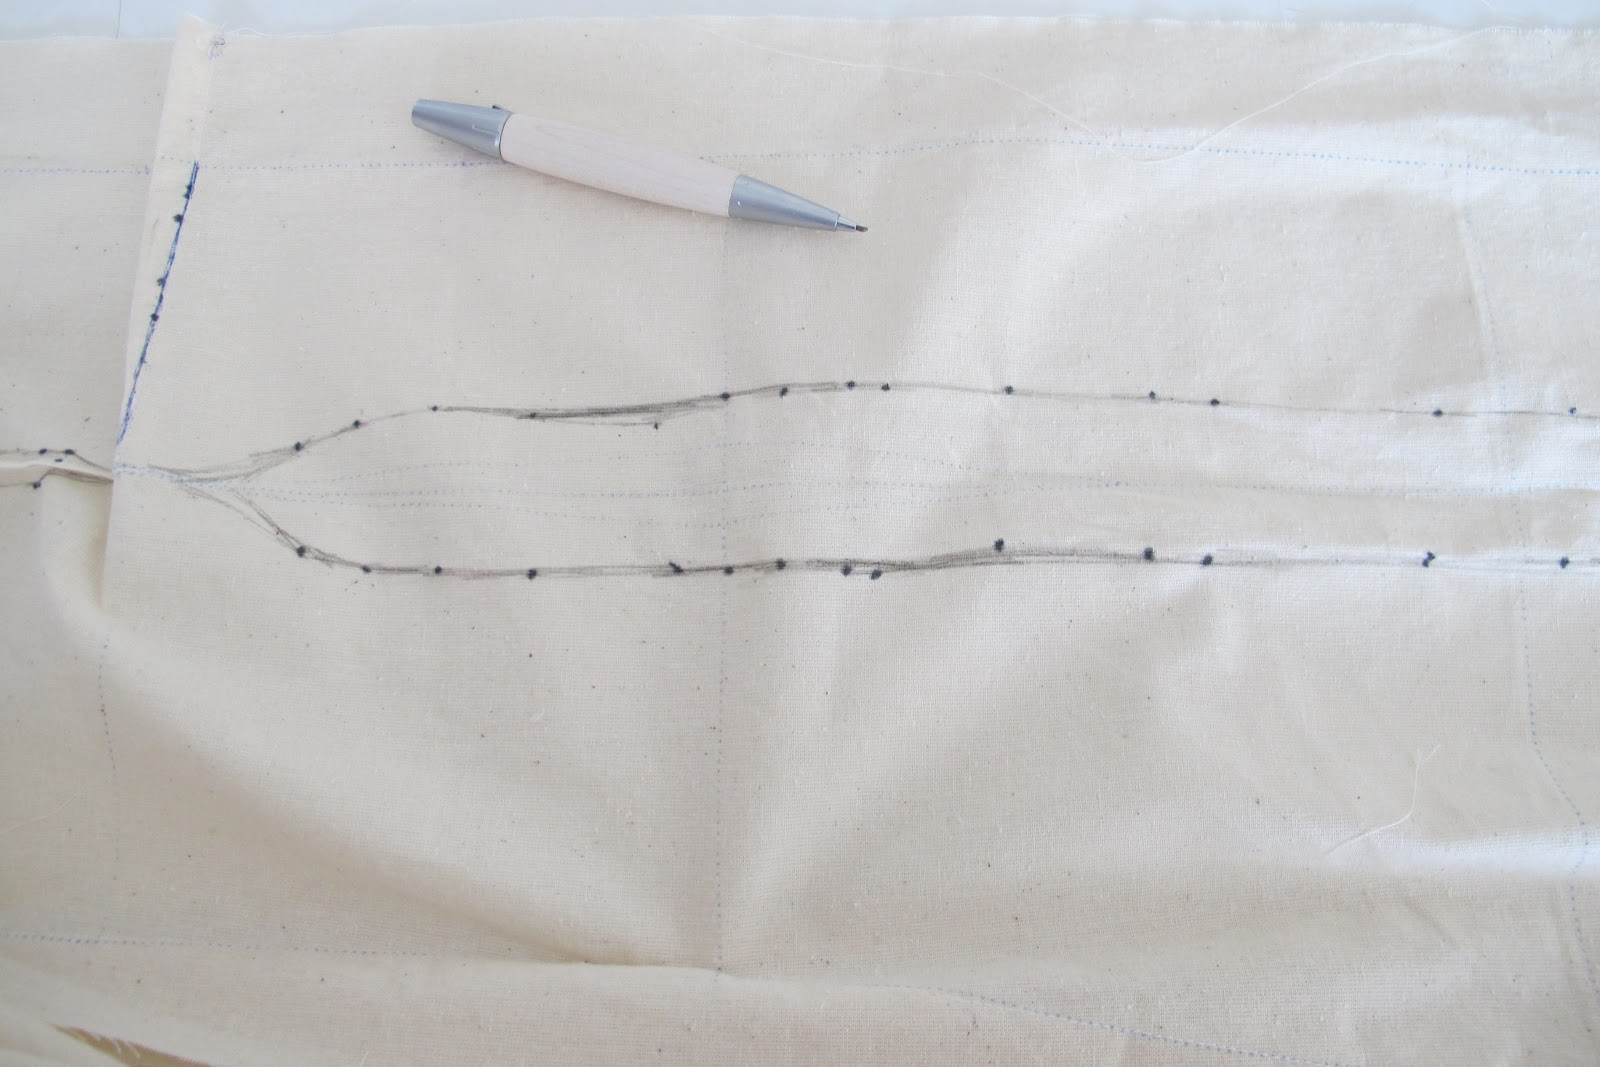
First, I used my basic bodice block to make a shell, to be opened at the center front. I marked vertical lines over the bust point at the front pieces and down from the shoulder darts at the back piece. I stitched the side seams with the sewing machine.

I put the shell on and closed it with pins at the center front, then pinned along the vertical markings until the shell fit snugly around my front body part. (I know these are not the most attractive photos of me, but oh well...) I should have pinned further down, though. I didn't and that makes my dress form now look quite bold and lumpish at the bottom (although I think that it doesn't influence fit, as this is not a "fit sensitive area" in the clothes I use to sew).

I had my husband to do the same at the back, and although he doesn't know anything about sewing and fitting, he did a great job with this (thank you, dear!). I think it helped that he had those vertical lines as a guide.

He also pinned the excess fabric away at the waist (my swayback) - and again, I think it helped that I had also marked the waistline on the shell before.
I also let him mark the neckline and the armholes on the fabric with a pen, and before putting the whole thing of, I marked the new center front with dots, on both sides (left and right), to be able to close it the same way again later.
Then I put the whole thing off, marked the placements of the pins and connected the lines to get some sort of "darts", which I stitched with my sewing machine.

I've always thought before that stuffing the whole thing would be the fun part of the whole process - I was wrong. That was the most awful part, and I almost broke off the whole experiment.
Here is what I did: First I made my dress form as small as possible with those adjustment wheels, to make sure that my new shell would fit over it. Then I put the shell on, closed it at the front with pins and started to stitch the front closed, beginning from the bottom. I also added a provisional drawstring to close the shell at the bottom.

I was ready to stuff it. For the filling, I used rubber foam flakes (is this the right word? I had to look it up in my dictionary and there are so many translations...). They were cheap and I was hoping that I could stuff them really tightly.

It didn't work out with stuffing tightly and firmly, since the shell fabric stretched out. It looked very nice, but when I checked the measurements with my new tape measure, it turned out that the new dress form had several centimeters of circumference more than I have. Removing a part of the rubber foam helped, though.
I stuffed the shell from the bottom to the top, inserting the flakes through the front opening and also through the armholes, while constantly checking the measurements and stitching the front opening closed, bit by bit. I used the handle of a wooden kitchen spoon to stuff the center back.


In the end, I stitched the rest of the center front seam, and closed the bottom drawstring definitely. I folded the neckline seam allowances towards the inside and closed the armholes with two patches of fabric.

That was it! This is what it looks like now:


I think it is still not perfect, but my self-made, fitted dresses now fit a lot better over my dress form, and I can put pins into it. I will see how it works with the next projects.
Things I would do better if I had to go through the same process again:
- I would use a sturdier, firmly woven fabric for the shell. Maybe then I could stuff it more tightly without stretching the fabric out, and the yellow filling material wouldn't show through.
- I would look for a better filling material, that would be easier to spread evenly under the fabric, without scrunching up in bulky balls. Although I still don't know what sort of material this could be.
- I would use a smaller dress form as a basic. It was quite difficult on some points to get the shell fabric over the dress form, and the new dress form does not mirror my swayback. There simply wasn't enough empty space between the dress form and shell to get the shape very exactly.
- I would use a pencil instead of a pen to make all the markings. I also wanted to have a beautiful dress form which is nice to look at, since it is a constant "decoration element" in my sewing cave. But the pen markings are there, and that spoils the whole look a bit!
Modifying my dress form wasn't as much fun as sewing a garment, but in the end I'm quite glad I did it. And if you stumbled upon this blog post because you are thinking about making or modifying your own dress form, I hope you got some helpful information from it. Feel free to leave me any questions if you have them!
Wow. This must have been a lot of work. At least now you have your own dressform. Your husband also did a good job. :) Welldone for not giving up halfway.
ReplyDeleteMarie, te ha llevado mucho trabajo!!enhorabuena..Te ha quedado muy bien. Te envio un enlace para que veas como lo modifico otra bloguera: http://cosircosersewing.blogspot.com.es/2012/02/maniqui-de-costura-tuneado.html.
ReplyDeleteBesitos
What a great idea!! I'll probably have to change my dress form after giving birth. Thank you for the tips!
ReplyDeleteHola Marie, me encanta todo lo que haces te invito a pasar por mi blog lupecienta para que veas mi maniquí. Saludos
ReplyDeleteWow, great job on persisting! That looks like reaaally hard work!
ReplyDeleteNo way are you allowed to call yourself a lazy seamstress after doing something like this!
I can't offer any advice on what you've done here but take a look at
the dress form I made myself if you want! It’s made of paper tape! Paper tape is better than duct tape because it doesn’t sag and stretch, and it doesn’t cover your pins in gunk. I’m so totally happy with it!
I made a tutorial for it on my blog. It’s really helped me grow my confidence with fitting. Still a long way to go though! :)
Here is my tutorial:
http://makingitwell.blogspot.co.nz/2012/03/i-made-my-own-dress-form.html
Well, bravo, I think it's amazing how you've done this and I'm sure that it's an improvement on the old form and that you'll come to love it. What it's name?
ReplyDeleteChanel No.6
Has hecho una trabajo fantástico!!! He aprendido un montón y soy muy feliz que has decidido ser honesta y publicar también los errores o cosas que mejorarías porque eso ayudará mucho cuando vaya a intentar eso, (que lo voy a hacer).
ReplyDeleteGracias por compartir todo esto,me voy a quedar por aquí para curiosear todo tu trabajo.
I think you're a genius! I was looking for a way to adjust my standard dress form thank you for the inspiration!
ReplyDelete