March 15, 2013

More serger practice...

There was not much sewing going on in the last time, but I did make a smaller project, to get a bit more practice with my serger.
Do you remember the wool knit fabric I bought from Britex when I was in vacation in San Francisco last year?

In der letzten Zeit hatte ich nicht so viel Zeit zum Nähen, aber ich habe ein bisschen mit meiner Overlock-Maschine geübt. 
Das ist der Wolljersey, den ich letztes Jahr in den Ferien in San Francisco gekauft habe:


It has an interesting pattern: dancing women in their circle skirts, seen from above. Now I finally made something out of that fabric: the very popular peplum top from Burda magazine 8/2012.

Das Muster ist sehr interessant: nicht einfach nur Kreise, sondern tanzende, sich drehende Frauen in weiten Röcken, von oben betrachtet. Jetzt habe ich endlich etwas aus dem Stoff genäht, und zwar das sehr beliebte Schösschen-Top aus der Burda 8/2012. 


As I made it from a knit fabric, I copied the pattern one size smaller than my usual burda size, and I eliminated the elbow dart from the sleeve pattern. I cut the back on the fold and, instead of the zipper, added a small closure with snaps. For the "closure facing" I used the patterned stripe that runs along the selvage of the fabric. However it turned out that the closure wasn't necessary, I can easily get my head through without opening the snaps.

Da ich es aus Jersey genäht habe, habe ich eine Grösse kleiner als sonst abgepaust. Am Ärmelschnitt habe ich den Ellbogen-Abnäher entfernt. Das Rückenteil ist im Stoffbruch zugeschnitten und wird, statt mit einem Reissverschluss, mit drei Druckknöpfen am Hals geschlossen. Für den Untertritt habe ich das Musterband vom Stoffrand verwendet. Es hat sich dann herausgestellt, dass der Verschluss gar nicht nötig war, ich bekomme den Kopf leicht auch mit geschlossenen Druckknöpfen durch die Halsöffnung. 


All in all, I'm quite happy with the outcome. The colors of the shirt feel quite unfamiliar and loud, as I usually don't wear any red, but the wool knit feels so warm and nice and comfortable, perfect for the last cool days before spring!

Insgesamt bin ich mit dem Oberteil ganz zufrieden. Die Farbe fühlt sich für mich allerdings etwas ungewohnt und kräftig an, da ich sonst niemals Rot trage. Aber das Oberteil ist so schön warm und angenehm zu tragen, gerade richtig für die letzten Wintertage!


February 18, 2013

Cozy Wool Knit Dress

There is nothing better to wear in winter than a cozy, warm wool knit dress with warm woolen tights. Better than any jeans could be!
As I need more practice in sewing knits anyway, and we have a really nice winter with snow here in Switzerland, I decided that I could use one more wool knit dress.

Im Winter gibt es keine bessere Kleidung als ein gemütliches, warmes Kleid aus Wolljersey und warme Strumpfhosen aus Wolle. Das hält wärmer und ist bequemer als jede Jeans!
Ich muss ja sowieso das Nähen von Strickstoffen mit der Overlock noch üben, und wir haben hier in der Schweiz zur Zeit einen wirklich schönen Winter mit einigermassen viel Schnee, also ist ein selbstgenähtes Wollstrickkleid perfekt für beide Zwecke. 


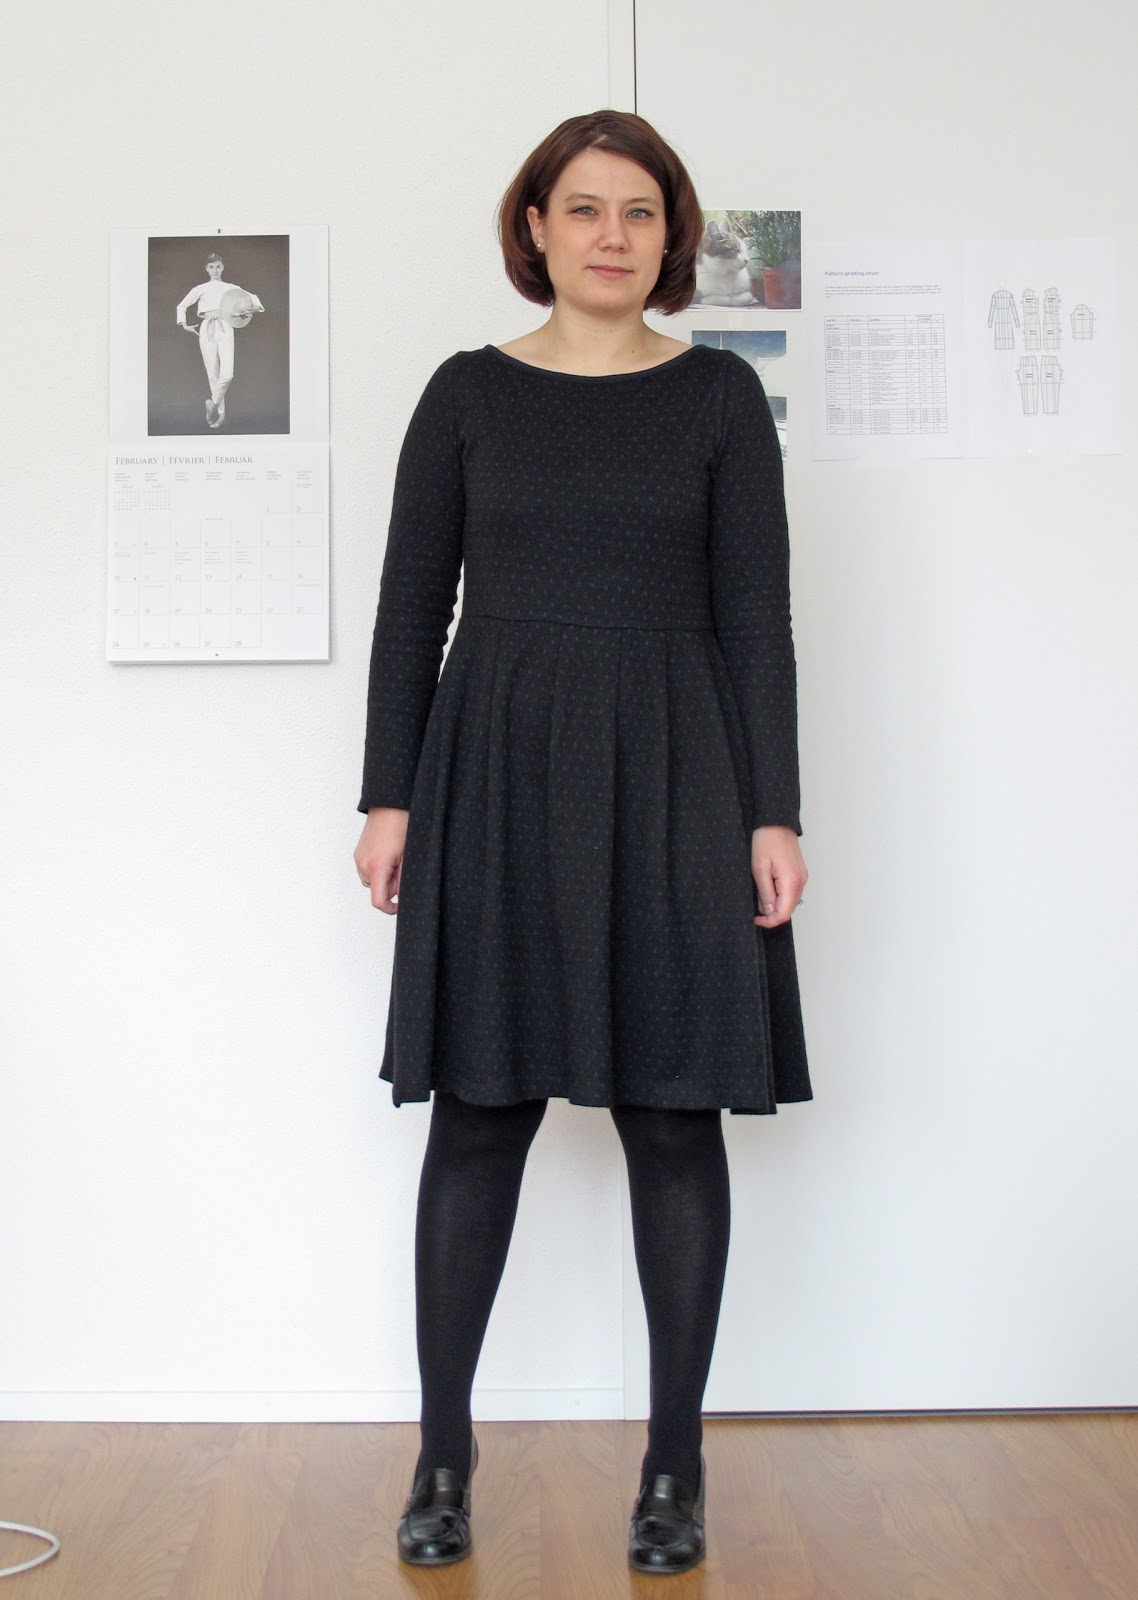
And here it is. I still have to get more practice in sewing knit fabrics, but the dress is warm, cozy, and it fits. The fabric is a very nice wool knit, black with small blue dots on the right side and blue on the wrong side.
I used Burdastyle's pattern no. 108 from the 2/2009 issue for the top part, cut at the waist and then shortened again by 2 cm, as the weight of the stretchy fabric pulled the waistline seam down. The pattern for the skirt is made by me, mainly it is two rectangles with pleats and rounded at the side seams.

Hier ist es: immer noch nicht perfekt genäht, aber warm, gemütlich, und es passt. Für das Kleid habe ich einen wunderbaren Wolljersey gefunden, schwarz mit blauen Pünktchen auf der rechten, und uni-blau auf der linken Seite. 
Für das Oberteil habe ich den Schnitt Nummer 108 aus der Burdastyle 2/2009 genommen und ihn bis auf Höhe der Taille gekürzt. Später habe ich ihn um weiter 2 cm gekürzt, da das Eigengewicht vom Rockteil das Oberteil gedehnt und nach unten gezogen hat. 

I attached some unstretched clear elastic to the waistline seam to prevent it from stretching out with time.

In die Taillennaht habe ich klares Gummiband ungedehnt mitgefasst, damit die Taille mit der Zeit nicht ausleiert. 


The neckline binding, for which I used the blue, wrong side of the fabric, worked better than usual. Maybe it was just luck, but this time, I only folded the binding on the outer side and not on the inner side, and it seemed to work better with my cover lock machine. (Although I think that it looks less clean inside the garment.)

Das Einfassen des Halsausschnitts hat diesmal besser geklappt als sonst. Ich habe es nur auf der Aussenseite eingeschlagen und an der Innenseite nicht, aber ich weiss noch nicht, ob es daran gelegen hat. Jedenfalls sieht das Ganze diesmal sauberer aus, zumindest von aussen. 


Another problem was with the "straight grain". I made the dress so that the straight grain was correct, but the the pattern of the small blue dots then doesn't run horizontally but is slanting down from left to right. Almost all of the patterned knit fabric I've used so far seem to have this problem!

Ein bisschen Kopfzerbrechen hat mir der "Fadenlauf" bereitet. Ich habe beim Zuschneiden darauf geachtet, dass der stimmt, aber dann laufen die Pünktchenreihen nicht mehr schön horizontal sondern schräg. Das Problem hatte ich bisher bei fast allen gemusterten Jerseys!

Anyway, there was plenty of fabric left, but not enough to make a top with it, so I used the leftover fabric to make a scarf. I stitched two long rectangles together with my sewing machine, turned the side edges over and cut near the stitching line, and that's it. I hope that winter will not be over too soon!

Von dem Stoff ist einiges übrig geblieben. Leider war es nicht genug, um daraus noch ein Oberteil zu nähen, aber für einen Schal hat es gereicht. Ich habe einfach zwei lange Rechtecke mit der Nähmaschine zusammengenäht, die Seitenkanten einmal umgeschlagen und festgenäht, und dann den überstehenden Stoff ganz dicht an der Nahtlinie abgeschnitten. Jetzt habe ich auch noch einen passenden Schal! Hoffentlich bleibt der Winter noch ein bisschen!


January 29, 2013

The Vintage Blouse: Finished!

A week before christmas, right when my vintage style blouse was finished, my computer hard drive broke. Luckily, I have a good backup system, so there was no data loss, but I had to wait several weeks to get it back from service with a new hard drive, and then it took me several days to set it up again. But now, I'm able to blog post again, and so to show you my new blouse made from a vintage pattern!

Eine Woche vor Weihnachten hat mein Computer aufgegeben. Zum Glück habe ich ein gutes Sicherungssystem, so dass ich diesmal wirklich keine Daten verloren habe. Ich musste aber mehrere Wochen warten, bis der Computer mit einer neuen Festplatte von der Reparatur wieder zurückkam, und dann hat es nochmal ein paar Tage gedauert bis alles wieder eingerichtet war. Aber jetzt ist er wieder voll einsatzfähig, und ich kann endlich meine neue Bluse nach altem Schnitt zeigen, die in der Zwischenzeit fertig geworden ist! 


The pattern I used is this vintage Simplicity pattern:

Das ist der alte Schnitt, den ich verwendet habe. Leider steht keine Jahreszahl drauf. 


The finished blouse sits better than the muslin and it also doesn't ride up like the muslin did, which I think is thanks to the fabric. I used the leftovers from a very lightweight wool, which I had made a dress of about a year ago. It was just enough fabric to make the blouse! 

Die fertige Bluse sitzt um einiges besser als die Probebluse, und vor allem rutscht sie nicht so nach oben! Ich denke, das liegt an dem Stoff, den ich verwendet habe: ein sehr feiner, leichter Wollstoff, aus dem ich vor etwa einem Jahr ein Kleid genäht habe. Für die Bluse habe ich den Rest verwendet; jetzt ist wirklich nichts mehr übrig, aber ich habe den Stoff voll ausgenutzt!


The blouse closes with buttons in the back, which works but is nothing for the early morning when you have to dress quickly to go to work, if you know what I mean... I was thinking about adding an in-seam side zip, but then I thought that this would spoil the whole vintage thing about it, and stayed with only the buttons. 

Die Bluse wird am Rücken mit Knöpfen geschlossen, was nett aussieht, aber es ist wirklich nichts für einen frühen Morgen, wenn man sich schnell anziehen muss um zur Arbeit zu kommen... Ursprünglich hatte ich geplant, noch einen Nahtreissverschluss an der Seite einzusetzen. Dann aber fand ich, dass das das ganze schöne "Vintage-Feeling" ruinieren würde, und habe es bei den Knöpfen belassen. 


I then decided to make it the real vintage way, and to exactly follow the instructions. (I did serge the edges, though, it's just so comfortable and clean!) And this raised a big question to me, which I hope you can help me with. 

Nachdem ich nun schon auf die Bequemlichkeit eines Extra-Reissverschlusses verzichtet hatte, dachte ich mir, dass ich genauso gut alles wie anno dazumal machen könnte und habe mich ganz an die Näh-Anleitung gehalten. (Mit einer Ausnahme: die Kanten habe ich doch mit der Overlock versäubert, da war die Versuchung zu gross!) Das hat jedoch eine Frage aufgebracht, über die ich vorher nie nachgedacht hatte, und von der ich hoffe, dass sie mir irgendjemand beantworten kann. Irgendwann. 

As written in the instructions, and in contrary to contemporary pattern instructions, I didn't use any interfacing on the neckline facings. Instead, the pattern told to sew the interfacing directly to the garment right at the seam lines. Which I did, using silk organza as interfacing. 

Wie es in der Anleitung angegeben ist, und im Gegensatz zu modernen Schnittanleitungen, habe ich die Besätze am Halsausschnitt nicht mit Einlage verstärkt. Statt dessen sollte die Einlage direkt am Kleidungsstück aufgenäht werden, direkt an der Nahtlinie. Das habe ich dann auch so gemacht. Als Einlage habe ich Seidenorganza verwendet (das war vielleicht schon die falsche Entscheidung?)


So far, so good. But since the garment is finished, the facing itself seems to lack some stability. It doesn't roll up or peek out of the garment, it just feels too soft and has to be put into place when I'm putting on the blouse. (I did understitch the facing, it's just not clear in the picture.) And the silk organza also hangs between those two layers of fabric and seems to stabilize nothing at all, left alone that it frays like nothing, although I had pinked the edges. Maybe it isn't meant to be used for interfacings?

So weit, so gut. Jetzt fühlt sich der Besatz aber etwas, nun ja, instabil an. Er rollt sich nicht etwa auf und rutscht auch nicht aus dem Ausschnitt, aber er fühlt sich "labbrig" an und muss beim Anziehen erst mal in die richtige Position gebracht werden. (Auch wenn man es auf dem Foto nicht erkennen kann: ich habe den Besatz mit den Nahtzugaben vernäht.) Und die Einlage hängt so frei zwischen den Stoffschichten und franst auch noch aus. Ist da was richtig schief gelaufen oder ist das für uns heute nur ungewohnt?


What do you think? Why are facings interfaced in contemporary sewing, but not in vintage sewing, and what do you think is the best way to stabilize facings? Any thoughts about that are pretty much appreciated!

Weiss irgendjemand die Lösung? Warum werden heute immer die Besätze verstärkt, aber bei den alten Schnitten nicht? Und welche Methode ist besser?

Apart from that mystery (to me), I just love this blouse. It goes well with jeans and is comfortable to wear!

Abgesehen davon trägt sich die Bluse sehr angenehm und passt auch gut zu Jeans, und wird sicher eines meiner Lieblingsstücke!


December 5, 2012

Vintage Blouse - The Muslin

I'm not the type for classical blouses, but having only t-shirts to wear with jeans is quite boring, so I think I'll have to make some nice tops. And I found this nice vintage Simplicity pattern which I really like. I want to make version 1, but with the wider neckline from the other versions, because the pattern is used and the version 1 neckline cut away, and without the shawl, as I don't have enough fabric.

Klassische Blusen stehen mir leider überhaupt nicht, aber zu Jeans immer nur T-Shirts zu tragen, wird mit der Zeit auch etwas langweilig. Und so habe ich mich sehr gefreut, diesen alten Schnitt gefunden zu haben. Mein Plan ist Version 1, aber mit dem weiten Ausschnitt der anderen Versionen (der Schnitt ist gebraucht und dabei wurde der engere Halsausschnitt leider abgeschnitten), und ohne den Schal, mangels Stoff. 


Unfortunately, the pattern is one size too large, so I had to grade it down a bit, which wasn't much of a problem except for the kimono sleeves. I still don't know if I did it "the right way". As I wasn't too sure about the fit of a vintage pattern, especially with that grading, I decided to make a muslin first. But I don't have any test fabric in my stash at the moment, and it was the weekend and too late to buy some, so I decided to make a wearable muslin from a cheap grey cotton poplin.

Leider ist das Schnittmuster eine Nummer zu gross für mich, also musste ich ihn etwas verkleinern. Das war aber kein Problem, mit Ausnahme der Kimono-Ärmel; ich weiss auch nicht, ob ich da richtig vorgegangen bin. Da ich mir mit der Passform bei so einem alten Schnitt nicht sicher war, und wegen der Schnittverkleinerung, habe ich lieber ein Probeteil genäht. Ich hatte aber keinen Teststoff mehr, also habe ich eine günstige, graue Baumwollpopeline aus meinem Vorrat genommen und ein "tragbares" Teststück daraus gemacht. 


There is still room for improvement, but I already love wearing the muslin as a new blouse!
Sewing the kimono sleeves was a bit tricky first, but then those pesky corners came out quite nice.

Das muss natürlich noch verbessert werden, aber ich denke, das Probeteil ist so durchaus schon tragbar! 
Die Kimono-Ärmel waren erst etwas knifflig, aber dann sind die Ecken doch ganz gut rausgekommen. 


The middle front part makes some slight bulges at the princess seam, but that should be easy to remove in the final garment.

Das mittlere Vorderteil wirft allerdings noch leichte Beulen an der Teilungsnaht, aber das sollte bei der endgültigen Bluse gut zu beheben sein. 


Maybe I should move the shoulder seam a bit more to the front to better fit my forward shoulders. But the overall fit seems to be quite nice, and the waist sits perfectly at its place.

Die Schulternähte sollte ich evtl. noch ein bisschen weiter nach vorne verlegen, weil meine Schultern auch sehr weit nach vorne gehen, besonders die rechte. 


For pattern grading, I measured the bust and waist width of the pattern very carefully. What I didn't think of was the hip width. Although the blouse does not reach the hips (maybe it's a bit short anyway, although I lengthened it already), the muslin was to tight below the waist. Never mind, I let open slits at the bottom of the side seams, which I decorated with two little bows.

Bei der Schnittverkleinerung habe ich die Brust- und Taillenweite auf dem Schnitt sehr genau nachgemessen. Was ich vergessen habe zu messen: die Hüftweite. Die Bluse geht zwar nicht bis zu den Hüften (sie ist sowieso ein bisschen arg kurz, obwohl ich sie schon um ca. vier Zentimeter verlängert habe), aber die Probebluse ist doch deutlich zu eng unterhalb der Taille. Fürs Probeteil aber kein Problem, ich habe einfach seitliche Schlitze offen gelassen und diese mit zwei einfachen Schleifchen verziert. 


The blouse is supposed to be closed with buttons at the back. I love this feature, but for the muslin I went the easy way and inserted a lapped zipper instead. I didn't have any matching buttons, anyway!

Die Bluse wird nach Schnittanleitung eigentlich mit Knöpfen im Rücken geschlossen. Ich hatte aber keine Knöpfe da und fand dies auch zu viel Aufwand für ein Probeteil, das vielleicht nie getragen wird, und habe statt dessen einen überlappten Reissverschluss eingenäht. 


I'm so happy that the muslin did turn out as an actually wearable garment! Isn't that nice: getting two new garments by sewing one pattern!

Im Grossen und Ganzen bin ich ziemlich zufrieden mit der Probebluse und habe sie schon mehrmals getragen. Super, so habe ich gleich noch ein Oberteil mehr!

December 3, 2012

Winter Sleep

The first thing I made when I had bought my first very own sewing machine, about eight years ago, was a pair of pajamas for my husband (who was my boyfriend back then). They turned out great, but now they are quite worn out, so I had to make him new ones.

Das Allererste, was ich genäht habe, nachdem ich mir meine erste eigene Nähmaschine gekauft habe, war ein Pyjama für meinen Mann. Das ist jetzt acht Jahre her, und der Pyjama ist ziemlich abgetragen, also habe ich ihm zwei neue genäht. 


For the t-shirt, I used a t-shirt pattern from the German Burda site, but then I was a bit angry with myself, because I could have also taken the Pete shirt pattern from the English site for free.
For the pants, I used only the pants part from a pajama download pattern on the German Burda site.

Das Tshirt habe ich mit einem einfachen Shirt-Schnitt zum Download auf der deutschen Burda Seite genäht. Danach ist mir aufgefallen, dass es auch ein kostenloses Schnittmuster für ein Herren-Tshirt gegeben hätte, nämlich "Pete" von der englischen Burda-Seite. Die Hosen sind von einem Pyjama-Einzelschnitt, den es auch auf der deutschen Seite gibt. 

I found a nice patterned cotton for the pants, and made the shirts from cotton jersey. It is hard to see on the photos, but the green pants have small white and red stripes, so I chose a red jersey for the shirt, and added a front pocket with a facing made from the pants fabric.

Die Hosen sind aus einem schönen, griffigen Baumwollstoff, die Tshirts aus Baumwolljersey. Die grüne Hose hat schmale, grüne und weisse Streifen, deshalb habe ich hier ein rotes Tshirt dazu genäht. Leider sieht man die Streifen auf dem Foto sehr schlecht, um diese Jahreszeit ist es aber auch schwierig, ein bisschen Licht zu erwischen! Auf das Tshirt habe ich noch eine Brusttasche aufgenäht, mit einem Besatz aus dem Hosenstoff, damit alles besser zusammen passt. 


For the second pair, I used a blue cotton fabric with white an light blue squares, and the shirt is also light blue. During this time of the year, it is difficult to catch a moment with enough light to make photos! I also monogrammed the shirts on the front, just for fun, because my sewing machine can sew them!

Der zweite Pyjama hat eine dunkelblaue Hose mit weissen und hellblauen Karos darauf, und das Tshirt ist auch hellblau. Dann habe ich noch in beide Tshirts ein Monogramm aufgenäht, nur zum Spass, und um die Buchstabenfunktion meiner Nähmaschine auch mal zu nutzen. 


But I didn't add any pockets to the pants, it's too often that I find forgotten handkerchiefs in the washing machine! ;)

Die Hosen haben aber keine Taschen bekommen, damit in der Waschmaschine nicht so oft Papiertaschentücher versehentlich mitgewaschen werden! ;)

Related Posts Plugin for WordPress, Blogger...